


Building Installation Packages with Windows Installer XML
A while ago, I needed to package and deploy an application and I did not want to
use Visual Studio Setup and Deployment, I opened my firefox and decided to look
for an alternative, what I got is WIX, windows installer xml.
So, I did some background check about WIX and I found out that its the right tool for what I needed to do, because it gives me full control as a developer to determine how my application is going to be installed on the clients' machines and gives full unrestricted access to Windows Installer functionality, but the learning curve associated with it is much and knowledge of xml is a prerequisite.
WIX is a free open source toolset that is used to build Windows installation packages from XML source code, originally it was developed by Microsoft but its now being maintained by Rob Mensching. It is written in C# and WIX itself is much like a programming language, but nothing to worry about, because with the knowledge of xml, the problem is half solved.
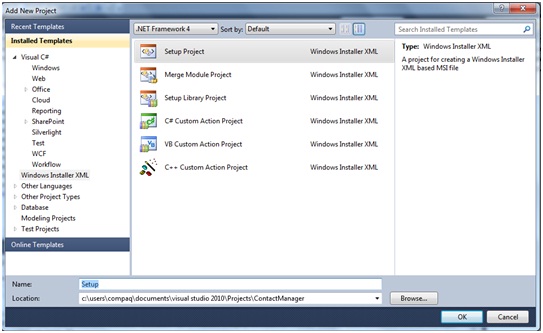
Now, dont let me bore you and lets get started, in this post, I am going to use WIX to deploy a c# contact manager application that saves and retreives data from an SQLite database. First of all you need to download the WIX toolset which contains visual studio plugin that install WIX project templates into visual studio, download the binaries here. After installing the toolset, it will install templates like this into visual studio.
The Setup project templates is what you need to add to the solution that contains the project you want to package, adding the wix setup project to contact manager gives
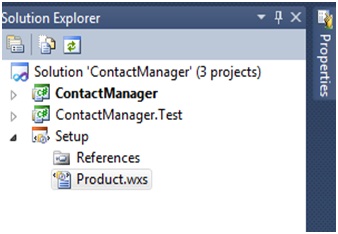
Note that a Product.wxs file has been added to the Setup project, this is an xml file that contains the setup code for the project. Another important point to note that is that you will be using guids heavily when using wix, good news is that visual studio has a guid generating tool, which can be accessed by clicking on the Tools menu and then select Create Guid.
The next thing to do is to right click the setup project and add reference to the project to be packaged, this will give us access to some project variables that can be referenced in the WiX source code, in this case I add reference to the ContactManager C# application. You also need to add reference to WixUIExtension.dll and WixUtilExtension.dll both contained in the WIX installation folder, these two libraries will expose some cool features that can be used to build a professional installation package.
Apart from the project variables that you have access to after adding reference to the project to be packaged, there are other variables that are exposed by WIX which can be used to build a robust installation package.
Inside the Product.wxs file is the <Product> element which includes <Package>, <Media>, <Directory>, <Component> and <Feature> elements needed to build an msi package.
The <Product> element has some useful attributes such as Name="this is the name of the project" Manufacturer="this is the product manufacturer" Version, Language and so on.
There is a <Package> element, with the attribute Compressed="yes" indicating that the package to be generated should be compressed. The <Media> element has attribute EmbedCab="yes" which indicates that the cabinet should be embeded.
The <Directory> element is used in various directory manipulations, such as accessing system's directory, creating new directory during installation and so on. The variable var.PlatformProgramFilesFolder gets a reference to the client's system Program files folder. In the snippet below, the <Directory element with attribute Id="ApplicationProgramsFolder is used to get reference to the client's system Application Programs Folder. <Shortcut> element is used to add shortcut, it has attribute Target="[INSTALLLOCATION]ContactManager.exe" which specifies the target of the shortcut, where INSTALLOCATION gets reference to the directory where the application is installed on the system. The <RegistryValue> element is used to add entries to the system's registry.
The <Feature> element is used to add all the features to the installation package, this is where all the files, directories are added to the package using various elements such as <Component>, <ComponentRef>, <ComponentGroupRef>, <File> and so on. The Installation user interface that the user installing the application sees is also constructed here, the default user interface can be used or better still your custom defined bitmap images can be added to the project and explicitly specified using the elements <WixVariable Id="WixUIBannerBmp" Value="Banner.bmp" /> for the banner that will appear on all dialog boxes during installation and <WixVariable Id="WixUIDialogBmp" Value="Dialog.bmp" />for the first and last dialog boxes, where Banner.bmp and Dialog.bmp must have been added to the wix project.
Adding files to the package can be achieved by nesting a<File> element inside the <Component> element and setting the Source attribute. The variable var.ContactManager.TargetDir gets reference to the base directory of the project to be packaged.
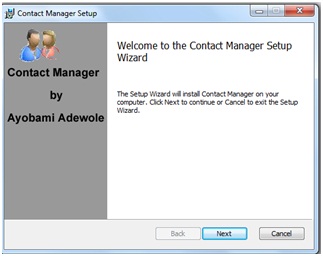
After the necessary files and components have been added, the wix setup project is then built, checking the Debug folder of wix setup project, you can now find Setup.msi file which is the installation package. Double clicking to install gives
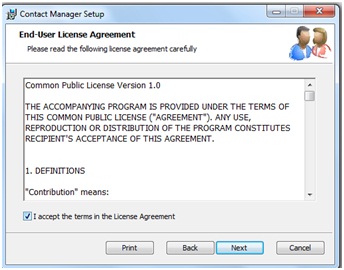
When you click next another dialog box comes up
This is the last screen after the installation is completed

The full source code can be downloaded here
So, I did some background check about WIX and I found out that its the right tool for what I needed to do, because it gives me full control as a developer to determine how my application is going to be installed on the clients' machines and gives full unrestricted access to Windows Installer functionality, but the learning curve associated with it is much and knowledge of xml is a prerequisite.
WIX is a free open source toolset that is used to build Windows installation packages from XML source code, originally it was developed by Microsoft but its now being maintained by Rob Mensching. It is written in C# and WIX itself is much like a programming language, but nothing to worry about, because with the knowledge of xml, the problem is half solved.
Now, dont let me bore you and lets get started, in this post, I am going to use WIX to deploy a c# contact manager application that saves and retreives data from an SQLite database. First of all you need to download the WIX toolset which contains visual studio plugin that install WIX project templates into visual studio, download the binaries here. After installing the toolset, it will install templates like this into visual studio.
The Setup project templates is what you need to add to the solution that contains the project you want to package, adding the wix setup project to contact manager gives
Note that a Product.wxs file has been added to the Setup project, this is an xml file that contains the setup code for the project. Another important point to note that is that you will be using guids heavily when using wix, good news is that visual studio has a guid generating tool, which can be accessed by clicking on the Tools menu and then select Create Guid.
The next thing to do is to right click the setup project and add reference to the project to be packaged, this will give us access to some project variables that can be referenced in the WiX source code, in this case I add reference to the ContactManager C# application. You also need to add reference to WixUIExtension.dll and WixUtilExtension.dll both contained in the WIX installation folder, these two libraries will expose some cool features that can be used to build a professional installation package.
Apart from the project variables that you have access to after adding reference to the project to be packaged, there are other variables that are exposed by WIX which can be used to build a robust installation package.
Inside the Product.wxs file is the <Product> element which includes <Package>, <Media>, <Directory>, <Component> and <Feature> elements needed to build an msi package.
The <Product> element has some useful attributes such as Name="this is the name of the project" Manufacturer="this is the product manufacturer" Version, Language and so on.
 <?xml version="1.0" encoding="UTF-8"?>
<Wix xmlns="http://schemas.microsoft.com/wix/2006/wi"
 xmlns:util="http://schemas.microsoft.com/wix/UtilExtension"
 xmlns:netfx="http://schemas.microsoft.com/wix/NetFxExtension">

<Product Id="287a3ea0-9a41-4b72-9c1d-abd16a2c3621"
Name="Contact Manager" Language="1033" Version="1.0.0.0"
 Manufacturer="Ayobami Adewole"
UpgradeCode="7e4e8648-30e3-4bb9-aa5c-9b68f277dac5">
There is a <Package> element, with the attribute Compressed="yes" indicating that the package to be generated should be compressed. The <Media> element has attribute EmbedCab="yes" which indicates that the cabinet should be embeded.
 <Package InstallerVersion="200" Compressed="yes" />
 <Media Id="1" Cabinet="media1.cab" EmbedCab="yes" />
The <Directory> element is used in various directory manipulations, such as accessing system's directory, creating new directory during installation and so on. The variable var.PlatformProgramFilesFolder gets a reference to the client's system Program files folder. In the snippet below, the <Directory element with attribute Id="ApplicationProgramsFolder is used to get reference to the client's system Application Programs Folder. <Shortcut> element is used to add shortcut, it has attribute Target="[INSTALLLOCATION]ContactManager.exe" which specifies the target of the shortcut, where INSTALLOCATION gets reference to the directory where the application is installed on the system. The <RegistryValue> element is used to add entries to the system's registry.
 <Directory Id="TARGETDIR" Name="SourceDir">
<Directory Id="$(var.PlatformProgramFilesFolder)">
<Directory Id="INSTALLLOCATION" Name="Contact Manager">

 <Directory Id="ProgramMenuFolder">
<Directory Id="ApplicationProgramsFolder"
     Name="Contact Manager"/>
   </Directory>
</Directory>
</Directory>
</Directory>

<DirectoryRef Id="ApplicationProgramsFolder">
 <Component Id="ApplicationShortcut"
Guid="20BC8446-684B-44F5-A1E3-AF6010EAF37C">
 <Shortcut Id="ApplicationStartMenuShortcut"
	 Name="Contact Manager"
	 Description="Contact Manager"
	 Target="[INSTALLLOCATION]ContactManager.exe"
	 WorkingDirectory="INSTALLLOCATION"/>
        <Shortcut Id="UninstallProduct"
	  Name="Uninstall Contact Manager
	  Target="[SystemFolder]msiexec.exe"
	  Arguments="/x [ProductCode]"
	  Description="Uninstalls Contact Manager" />
      <RemoveFolder Id="ApplicationProgramsFolder"
       On="uninstall"/>
       <RegistryValue Root="HKCU"
      Key="Software\Ayobami Adewole\Contact Manager"

     Name="installed" Type="integer" Value="1" KeyPath="yes"/>
      </Component>
    </DirectoryRef>
The <Feature> element is used to add all the features to the installation package, this is where all the files, directories are added to the package using various elements such as <Component>, <ComponentRef>, <ComponentGroupRef>, <File> and so on. The Installation user interface that the user installing the application sees is also constructed here, the default user interface can be used or better still your custom defined bitmap images can be added to the project and explicitly specified using the elements <WixVariable Id="WixUIBannerBmp" Value="Banner.bmp" /> for the banner that will appear on all dialog boxes during installation and <WixVariable Id="WixUIDialogBmp" Value="Dialog.bmp" />for the first and last dialog boxes, where Banner.bmp and Dialog.bmp must have been added to the wix project.
    <Feature Id="ProductFeature" Title="Contact Manager" Level="1">
      <ComponentRef Id="ApplicationShortcut" />
      <ComponentGroupRef Id="Product.Generated" />
      <ComponentGroupRef Id="Components" />
    </Feature>
    <Property Id="WIXUI_INSTALLDIR" Value="INSTALLLOCATION" />
    <UIRef Id="WixUI_InstallDir" />
    <Property Id="WIXUI_EXITDIALOGOPTIONALCHECKBOXTEXT"

Value="Launch Contact Manager" />
    <Property Id="WixShellExecTarget"

 Value="[INSTALLLOCATION]ContactManager.exe" />
    <CustomAction Id="LaunchApplication" BinaryKey="WixCA"

DllEntry="WixShellExec"

 Impersonate="yes" />
    <UI>
   <Publish Dialog="ExitDialog" Control="Finish" Event="DoAction"

Value="LaunchApplication">

WIXUI_EXITDIALOGOPTIONALCHECKBOX = 1 and NOT Installed</Publish>
    </UI>
    <WixVariable Id="WixUIBannerBmp" Value="Banner.bmp" />
    <WixVariable Id="WixUIDialogBmp" Value="Dialog.bmp" />
 	</Product>
</Wix>
Adding files to the package can be achieved by nesting a<File> element inside the <Component> element and setting the Source attribute. The variable var.ContactManager.TargetDir gets reference to the base directory of the project to be packaged.
   <Component Id="cmp3CD83BDDE0C679AC83F36ABCCC44B85F" Guid="*">
    <File Id="fil48A9C4979800A1A57A6A9059191EC957"
KeyPath="yes"
Source="$(var.ContactManager.TargetDir)\ContactManager.s3db"/>
      </Component>
After the necessary files and components have been added, the wix setup project is then built, checking the Debug folder of wix setup project, you can now find Setup.msi file which is the installation package. Double clicking to install gives
When you click next another dialog box comes up
This is the last screen after the installation is completed
The full source code can be downloaded here
Share this page on
 2
Comment(s)
114
People Like(s) This Page
2
Comment(s)
114
People Like(s) This Page
 Permalink
comments powered by Disqus
Older Comment(s)
 willard
Monday, December 31, 2012 12:41 AM
Thank for your article. I don't know where to add the last component element you mentioned. Could you post the whole Product.wxs?
 Ayobami Adewole
Tuesday, January 01, 2013 8:30 AM
The component element is an xml tag, that you need to add to your Product.wxs file to enable you add components such as file to your setup project, you can add it inside the DirectoryRef element